How to Build a Box Joint Jig & Dial In a Perfect Fit
The box joint is one of woodworking's most satisfying joints—strong, beautiful, and surprisingly achievable with a shop-made jig. In our Cedar Rapids shop, we use this joint on everything from keepsake boxes to drawer construction. Here's the complete guide to building the jig and, critically, how to micro-adjust it until the fit is flawless.
Why Box Joints?
Also called finger joints, box joints are the workhorses of corner joinery. Each interlocking finger provides an enormous long-grain glue surface, making a properly fitted box joint stronger than the wood itself. Unlike dovetails, which require hours of hand-work or an expensive router jig, box joints can be cut quickly and repeatably on a table saw with a simple shop-made sled.
For our clients across Cedar Rapids, Marion, and Hiawatha, box joints appear in jewelry boxes, blanket chests, shop toolboxes, and decorative storage. The exposed end grain creates a beautiful rhythmic pattern that becomes a design feature in its own right—especially when you combine contrasting species like walnut and maple.
Understanding the Anatomy of a Box Joint
Before building the jig, you need to understand what makes the joint work. A box joint consists of evenly-spaced fingers (the projecting tabs) and notches (the gaps between them). The fingers on one board fit precisely into the notches of the mating board, and vice versa.
Three dimensions define every box joint:
- Finger width — The width of each tab. Common sizes are 1/4", 3/8", and 1/2". For stock under 3/4" thick, 1/4" fingers look proportionally elegant. For thicker stock, 3/8" or 1/2" are appropriate.
- Finger depth — Must equal the thickness of the mating board exactly. If your sides are 1/2" thick, each finger must project exactly 1/2".
- Spacing — The distance from one finger to the next. This is what the jig controls, and it must precisely equal the finger width. If the spacing is even a few thousandths of an inch off, the error compounds across every finger and the joint won't fit.
Tools & Materials
Here's everything you'll need. Most of this you likely already have in a modest shop here in the Cedar Rapids–Marion metro area:
- Table saw — Any cabinet or contractor saw with a standard 3/4" miter slot
- Dado blade set — A stacked dado set that can be shimmed to your exact finger width (8" is standard)
- Miter gauge — Your stock miter gauge works fine, though an aftermarket gauge with a longer bar reduces play
- 3/4" Baltic birch plywood — For the auxiliary fence (approximately 4" × 18")
- Hardwood offcut — For the registration key (maple, cherry, or any stable hardwood)
- Brass shim stock — 0.002" and 0.005" thicknesses (available at any hardware store in the Cedar Rapids area, or online)
- Blue painter's tape — For quick micro-adjustments
- Scrap wood — Same species and thickness as your project for test cuts
- Wood glue & clamps
- Dial calipers — Essential for measuring the dado width accurately to thousandths
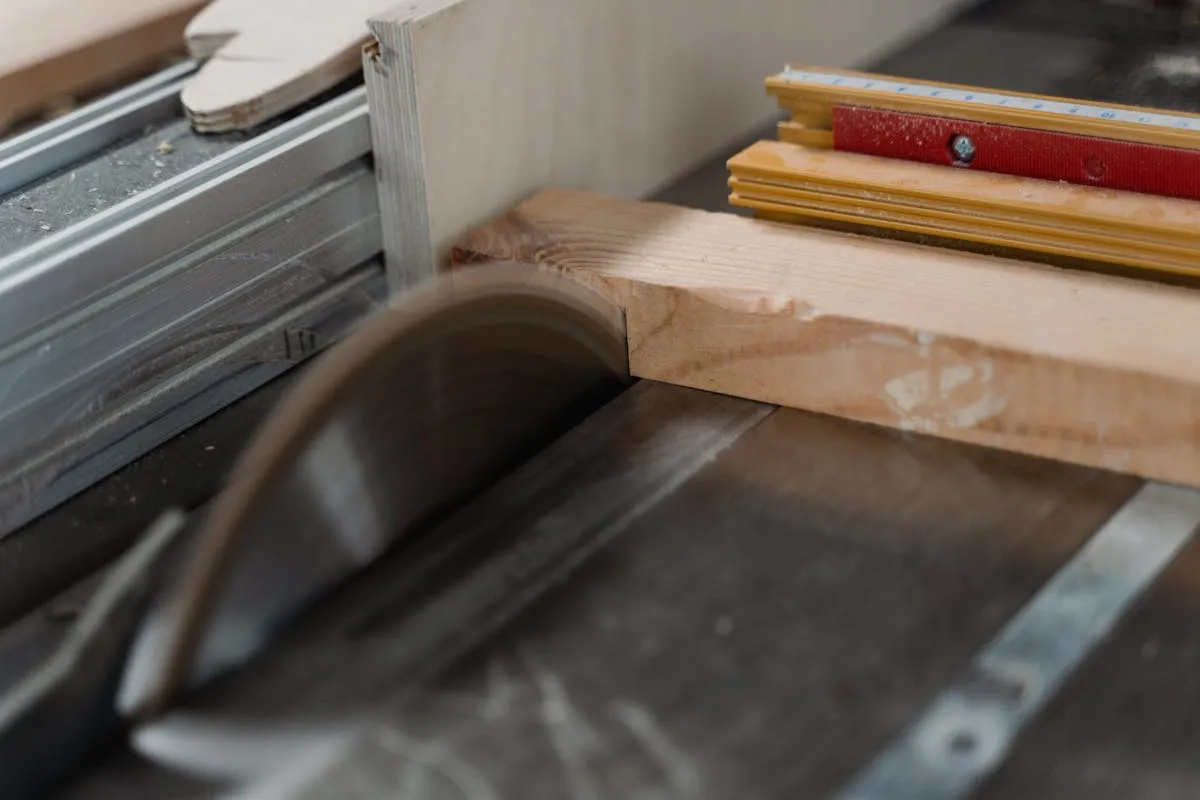
Step 1: Set Up the Dado Stack
The dado blade width is the finger width. This is the most critical measurement of the entire build. Many woodworkers in Eastern Iowa and beyond skip this step and pay for it later.
Start by deciding on your finger width. For this guide, we'll use 3/8", which is versatile and visually balanced on most projects.
Install your dado stack and make a test cut in a piece of scrap. Now measure the width of the resulting groove with dial calipers—not a tape measure. You're targeting 0.375". Most dado sets don't hit exact fractional sizes out of the box. Use the shims included with your dado set (typically paper, plastic, or metal) to add or remove width in tiny increments.
Pro tip: Keep a log of your shim combinations. Once you find the right stack for 1/4", 3/8", and 1/2", write it down and tape it to the inside of the dado set's case. In a busy shop, this saves 20 minutes of fiddling every time.
Set the blade height to match the thickness of your workpiece. If your sides are 1/2" thick, the dado should cut exactly 1/2" deep. Err slightly proud (a hair over) rather than under—you can always sand or plane the fingers flush, but you can't add wood back.
Step 2: Build the Auxiliary Fence
The auxiliary fence is the backbone of the jig. It attaches to your miter gauge and carries the registration key that indexes each cut.
- Cut the fence blank. Use 3/4" Baltic birch plywood, approximately 4" tall and 18" long. Plywood is more dimensionally stable than solid wood, which matters because any warping will throw off the spacing. MDF also works but doesn't hold screws as well at the edges.
- Attach the fence to the miter gauge. Use the pre-drilled holes in your miter gauge face. Fasten with machine screws and washers so the fence sits flat and square to the table. Two screws are sufficient; three is better for a long fence.
- Verify squareness. Hold a combination square between the fence face and the miter slot. The fence must be perfectly perpendicular to the blade. If it's not, the fingers will be angled and the joints won't mate. Adjust and re-tighten.
Step 3: Cut the Key Slot
With the fence attached to the miter gauge, raise the dado blade to about 3/8" (it doesn't need to cut all the way through the fence). Now push the miter gauge through the blade to cut a notch in the auxiliary fence. This slot is where the registration key will live.
This first cut position doesn't matter yet. You're simply creating a slot. What matters is the next step—where you position the key relative to the blade.
Step 4: Make & Install the Registration Key
The registration key is the heart of the jig. It's a small piece of hardwood that fits snugly into the slot you just cut. The key must be exactly the same width as your dado cut. Use the same calipers to verify.
- Mill the key. Rip a strip of hardwood to match the dado width. Test the fit in the slot—it should slide in with light friction, not sloppy and not too tight. The key should project about 3/8" proud of the fence face.
- Position the key. Here's the critical geometry: the distance from the near edge of the key to the near edge of the dado blade must equal exactly one finger width (3/8" in our example). This spacing is what creates the repeating pattern.
- Glue the key in place. Once you've confirmed the spacing (we'll verify with test cuts next), glue the key into the fence slot with a drop of CA glue or wood glue. Some woodworkers prefer to leave the key removable with friction alone, which allows swapping keys for different finger widths.
How the key works: You place the first board against the key, make a cut, then slide the board so the notch you just cut sits over the key. The key indexes the next cut at exactly one finger-width away. Repeat across the board. The second (mating) board starts offset by one notch width—the key itself acts as that offset when you butt the second board against it with a spacer.
Step 5: The First Test Cut
Grab two pieces of scrap wood that are the same species and thickness as your project wood. Label them "A" and "B."
- Board A, first cut: Butt Board A against the registration key with the end against the fence. Push the sled through the blade. This creates your first notch.
- Board A, subsequent cuts: Lift the board, place the notch you just cut over the registration key, press the board flat against the fence, and push through. Repeat across the full width.
- Board B (the mate): Place Board B against the fence with a spacer between the board's edge and the key. The spacer should be the same thickness as one finger width (another offcut from your dado cut works perfectly). This offsets Board B by exactly one notch, so its fingers align with Board A's notches. Cut across the full width using the same key-indexing method.
Now try fitting A and B together. This is the moment of truth.
Step 6: Reading the Fit — The Three Scenarios
Your test joint will tell you exactly what needs adjusting. Here's how to diagnose it:
Scenario 1: Too Tight — Fingers Won't Seat
If you have to hammer the joint together (or it won't go at all), the spacing is too narrow—the key is too close to the blade. Each finger is slightly wider than the notch it needs to fit into.
Fix: Move the key away from the blade by a tiny amount. We're talking thousandths of an inch here, not fractions. This is where micro-adjustment technique comes in (see below).
Scenario 2: Too Loose — Sloppy, Visible Gaps
If the joint slides together with no resistance and you can see daylight between the fingers, the spacing is too wide—the key is too far from the blade. Each finger is narrower than the notch.
Fix: Move the key toward the blade.
Scenario 3: The Piston Fit — What You Want
The joint should push together with firm hand pressure alone—no mallet, no gaps. When you pull it apart, there should be a slight suction. Woodworkers call this the "piston fit." It means the long-grain surfaces are in full contact, and when you add glue, the joint will be stronger than the surrounding wood.
Step 7: Micro-Adjustment Techniques
This is where most guides stop, and where most frustration begins. Getting from "close" to "perfect" requires moving the registration key by amounts so small you can barely see them. Here are the techniques we use daily in our shop serving the Cedar Rapids, Marion, and Hiawatha communities:
Method 1: Brass Shim Stock
This is the most precise method. Brass shim stock comes in rolls of 0.001", 0.002", 0.003", and 0.005" thicknesses.
- Too tight? Place a shim between the far side of the key and the fence slot before gluing. This pushes the key away from the blade.
- Too loose? Place a shim on the near side (blade side) of the key.
A 0.002" shim shift may seem trivial, but on a joint with 10 fingers, the cumulative effect is 0.020"—the difference between sloppy and perfect. Always re-cut test pieces after each shim change. Never adjust and go straight to project wood.
Method 2: Painter's Tape Shims
Standard blue painter's tape is approximately 0.003" to 0.004" thick. For quick adjustments:
- Cut a small strip and place it on the appropriate side of the key, or on the face of the fence where the miter gauge attaches.
- One layer of tape shifts about 0.004". Half-width strips give you about 0.002" of offset on average due to compression.
This method is fast and surprisingly effective for getting into the ballpark before confirming with calipers.
Method 3: The Tap-and-Lock
If your key is friction-fit (not glued), you can tap the key laterally with a small hammer and a hardwood block. One light tap on the correct side moves the key by just a hair. Tighten the set screw or clamp after each adjustment.
The golden rule of micro-adjustment: Change one variable at a time, and always verify with a fresh test cut before committing to your project stock. Iowa's seasonal humidity swings—especially in the Cedar Rapids corridor where winter shop humidity can drop below 30%—can cause subtle wood movement between sessions. It's wise to re-verify your jig setup at the start of every glue-up day.
Method 4: Adjustable Fence Design (Advanced)
For a more permanent solution, build an adjustable fence: mount the registration key in a small sliding sub-fence with a slot-and-bolt mechanism. A 1/4-20 bolt through a slotted hole allows you to nudge the key position with a wrench and lock it down. This is the setup we keep permanently tuned in our shop—it saves time across dozens of projects each year.
Common Mistakes & How to Avoid Them
After years of cutting box joints for clients from Hiawatha to Marion to downtown Cedar Rapids, these are the pitfalls we see most often:
- Not holding the workpiece firmly against the fence. Any tilt or gap between the board and fence creates tapered fingers. Use a toggle clamp or firm hand pressure, and always keep the workpiece flat on the table surface.
- Skipping the test cut. Never cut project wood until you've verified the fit on scrap of the same species and thickness. Different species compress differently under the blade, and even the same species can vary between boards.
- Using a dull dado stack. A dull blade tears the fingers instead of cutting them cleanly, leaving rough walls that prevent a clean fit. If you see fuzzy end grain or burn marks, sharpen or replace the blade.
- Inconsistent board thickness. If Board A is 0.505" thick and Board B is 0.498" thick, the fingers will stand proud on one side and sit short on the other. Thickness-plane all pieces to an identical dimension before cutting joints.
- Forgetting the offset on the mating board. The second board must be offset by one finger width. The most common beginner mistake is cutting both boards from the same starting position, resulting in two identical boards whose fingers align rather than interlock.
- Cumulative error. Small errors multiply across every finger. A 0.003" spacing error on a joint with 8 fingers becomes 0.024" by the last finger—a visible and ugly gap. Dial in the fit on test pieces before committing.
Glue-Up Tips for Perfect Box Joints
Once your joints fit like pistons, the glue-up is straightforward—but there are still ways to go wrong:
- Apply glue to the notches, not the fingers. A thin, even coat along the walls of each notch. The fingers will spread the glue as they seat. Too much glue in the notches creates hydraulic lock and the joint won't seat fully.
- Use cauls to distribute clamp pressure. Box joints need pressure along two axes. Flat cauls (scrap wood with packing tape on the face to prevent sticking) spread the clamp force evenly across all the fingers.
- Check for square immediately. Measure diagonals while the glue is still wet. Adjust with diagonal clamp pressure if needed. Once PVA sets, you're committed.
- Clean squeeze-out promptly. A damp rag removes excess glue from the joint lines before it skins over. Dried squeeze-out in the tight finger gaps is nearly impossible to remove and will show through any stain or finish.
Species Selection for Visible Box Joints
Box joints are a decorative feature, so the species combination matters. Here are combinations we recommend to our clients in the Cedar Rapids–Marion–Hiawatha area:
- Walnut & Maple — The classic high-contrast pairing. Dark walnut fingers against creamy maple notches (or vice versa) creates a striking geometric rhythm.
- Cherry & Ash — A warmer, subtler contrast. The cherry deepens to a rich amber over time while the ash stays pale.
- White Oak & Sapele — For a refined, Craftsman-era look. The open pores of the oak against the ribbon-stripe of sapele give the joint visual depth.
- Single species — Even a single-species box joint is beautiful. The end-grain pattern of the fingers contrasts naturally with the long-grain of the board faces, creating a subtle checkerboard effect.
When to Choose Box Joints Over Dovetails
We're often asked this question at our Cedar Rapids workshop. The honest answer: it depends on the project.
- Choose box joints when you want a clean, modern geometric look, when you're building multiples (the jig makes repetition fast), or when the joint will be on all four corners of a box and visual consistency matters.
- Choose dovetails when the project demands a traditional aesthetic, when mechanical resistance to pulling apart is critical (dovetails lock in one direction), or when the piece is a one-off showpiece.
- Either works for drawer boxes, jewelry boxes, small chests, and decorative storage. Both joints are strong enough for any application when properly glued.
Maintaining Your Jig
A well-made jig lasts for years, but it's not a "set it and forget it" tool—especially with Iowa's humidity swings:
- Store flat. Hanging a plywood fence can introduce a slight warp over time. Lay it flat on a shelf or in a drawer.
- Re-verify seasonally. Wood moves. A jig built in the dry winter months may cut slightly differently in the humid summer. A quick test cut at the start of a session takes two minutes and can save an entire sheet of expensive hardwood.
- Wax the miter bar. A coat of paste wax on the miter gauge bar keeps the sled sliding smoothly and prevents rust in a non-climate-controlled garage shop.
- Replace the key if it's worn. After hundreds of cuts, the hardwood key can compress or round over. Mill a fresh one—it takes five minutes.
Bringing It All Together
The box joint jig is one of the highest-value shop fixtures you can build. For the cost of a plywood offcut and an hour of setup time, you gain the ability to produce strong, beautiful joinery on an unlimited number of projects. The secret isn't in the jig itself—it's in the patience to make test cuts and micro-adjust until the fit is dead-on.
Whether you're building a jewelry box for a gift, drawer boxes for a kitchen remodel, or a blanket chest that'll be handed down for generations, the box joint delivers strength, beauty, and the unmistakable look of craftsmanship. And if you'd rather have us build it for you, our shop serves woodworking clients throughout Cedar Rapids, Marion, Hiawatha, and the greater Eastern Iowa corridor. We'd love to put this joint to work on your next project.
Frequently Asked Questions
What is the difference between a box joint and a dovetail?
Box joints have evenly-spaced square fingers, while dovetails have angled, wedge-shaped tails that mechanically resist being pulled apart in one direction. Choose box joints for a clean, modern geometric look and when building multiples. Choose dovetails when you need directional pull resistance or a traditional aesthetic.
How do I fix a box joint that is too tight?
If the joint is too tight, the registration key is too close to the blade. Move the key away from the blade by a few thousandths of an inch using brass shim stock (0.002 inch) placed between the far side of the key and the fence slot. Always re-cut test pieces after each shim change before cutting project wood.
What size box joint fingers should I use?
Common finger widths are 1/4 inch, 3/8 inch, and 1/2 inch. For stock under 3/4 inch thick, 1/4 inch fingers look proportionally elegant. For thicker stock, 3/8 inch or 1/2 inch fingers are more appropriate. The finger depth must equal the thickness of the mating board.
Why do my box joint fingers have gaps?
Gaps mean the spacing is too wide and the registration key is too far from the blade. Move the key toward the blade using a brass shim on the near side. Even a 0.002 inch error compounds across every finger, so a joint with 10 fingers can show a visible 0.020 inch gap at the last finger.
Do I need a dado blade to cut box joints?
A stacked dado blade set is the standard tool for cutting box joints on a table saw. The dado blade width equals the finger width. While it is possible to cut box joints with a regular blade using multiple passes, a dado set is far more efficient and produces cleaner, more consistent results.
The Box Joint Challenge
Test your knowledge of box joint jig building.
Across
- 1 The width of the cut left by a saw blade
- 3 The distance between fingers must be exactly this
- 4 The saw ______: cuts the notches for each finger
Down
- 2 The auxiliary barrier that holds the registration key
- 5 A type of stacked blade set used to cut the notches